
FAQs
All the answers that can help you save time and resolve issues without generating a support ticket
Portal
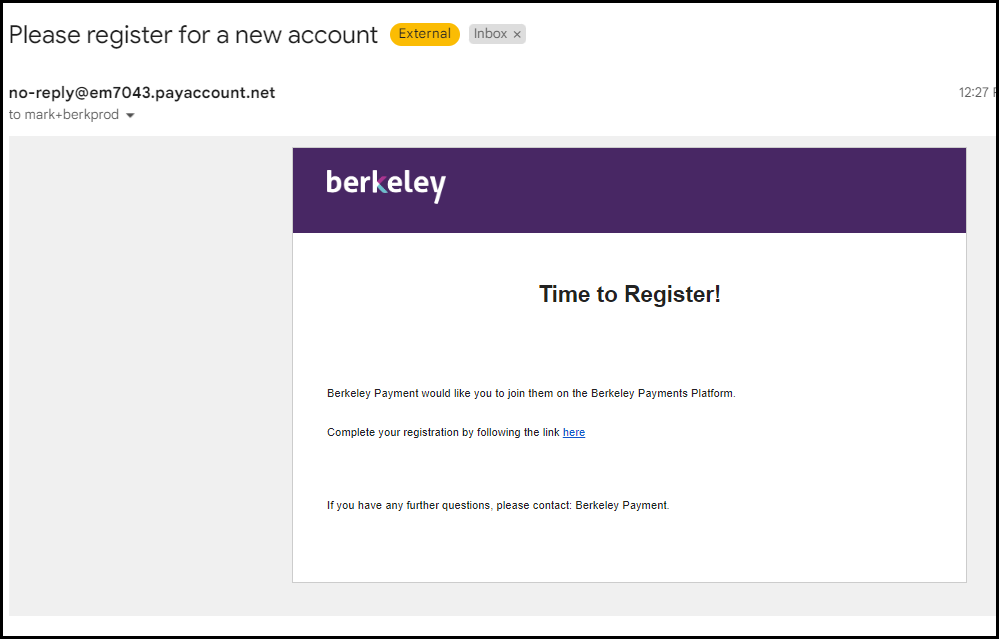
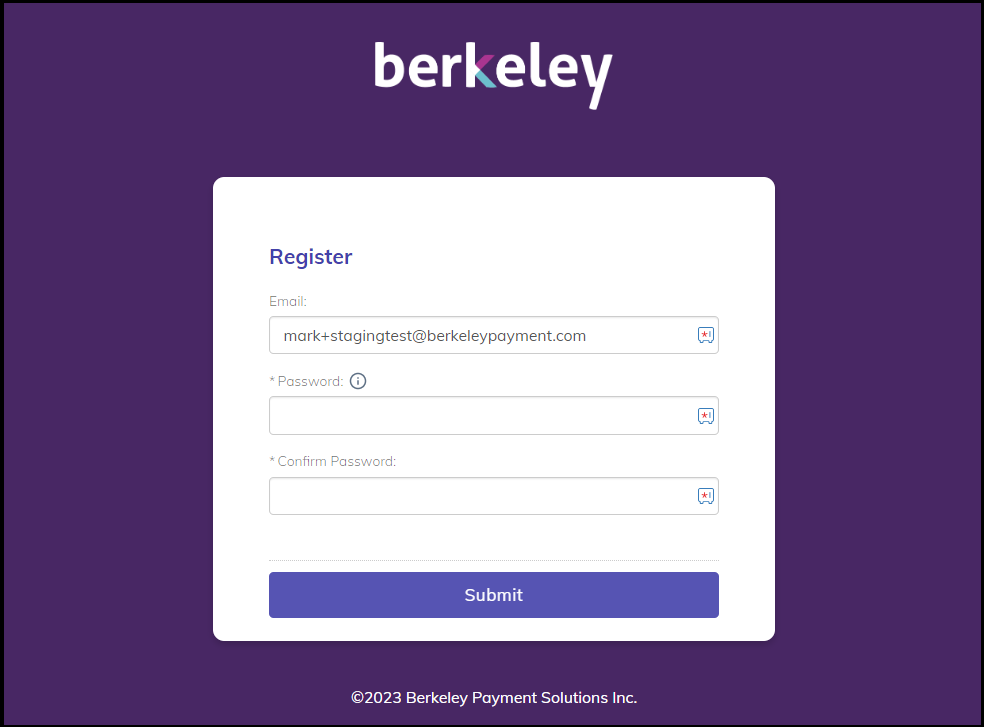
How do I get access to the portal?
Once your account is ready for production you will receive an email invitation where a link directs you to the portal login page to set up your password.
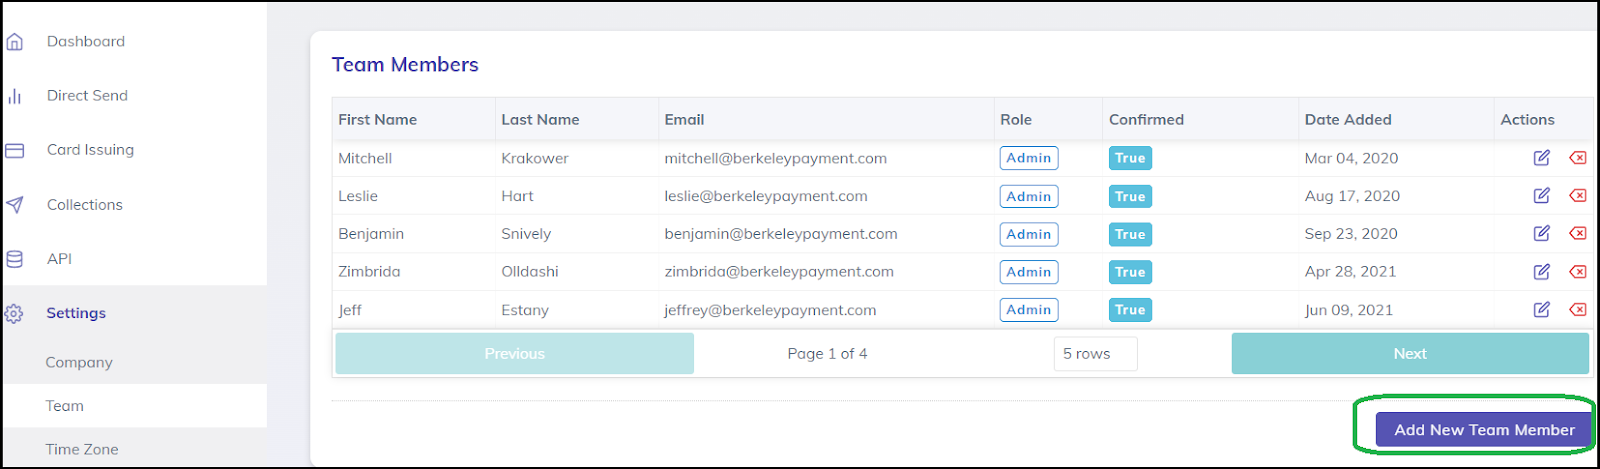
How can I add other users to the portal?
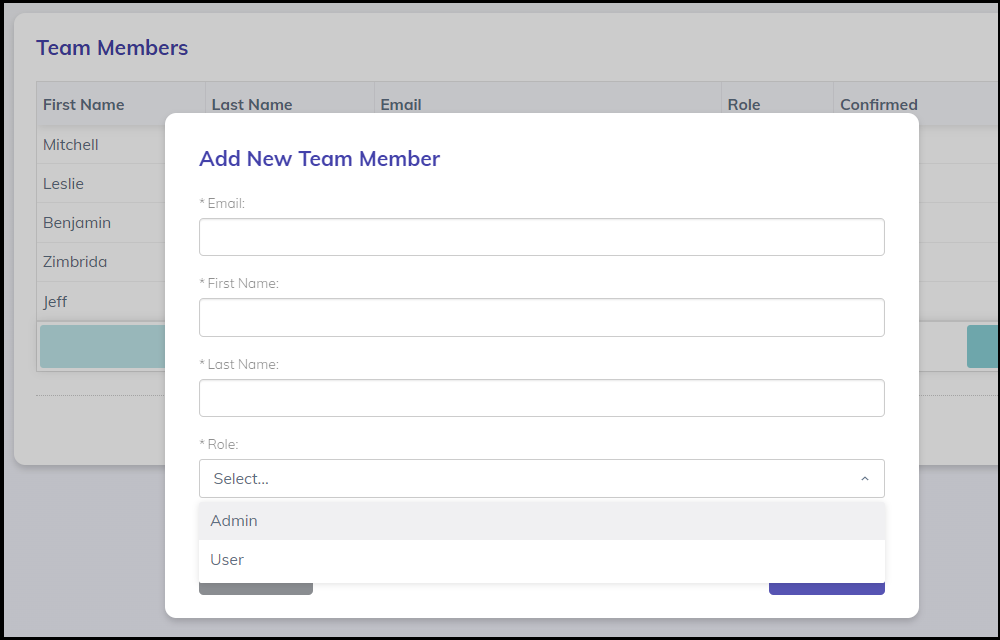
- Under Settings go to Team then select Add New Team Member. The users will then receive the registration link to set up their password.
- Fill in the user’s email address, first and last name. ALWAYS choose Admin for the Role. Hit Submit.
Which reports are available from my program?
Depending on your program and or your contract parameters, you will have access to a combination of the standard automated reports below:
MCR Reloadable/Non-Reloadable
- Shows the details of cards created in your program within a specified time range.
Value Load Report
- Shows the all the loads that go into cards
Escrow Transaction Report
- Shows funds going in and out of the escrow account
Transaction Report
- Shows transactions made on the cards
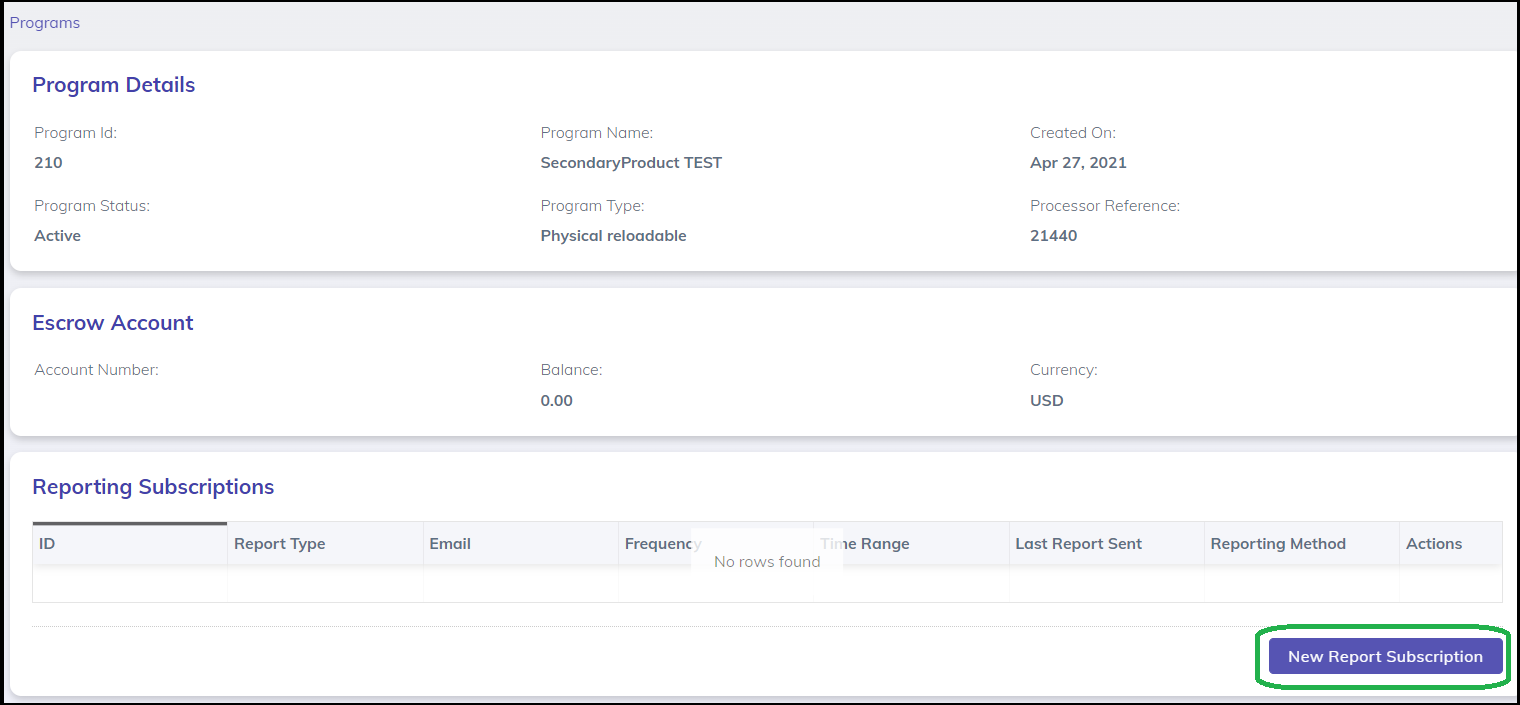
How can I set up a reporting service for my program?
- From the Program Details page, click on New Report Subscription.
-
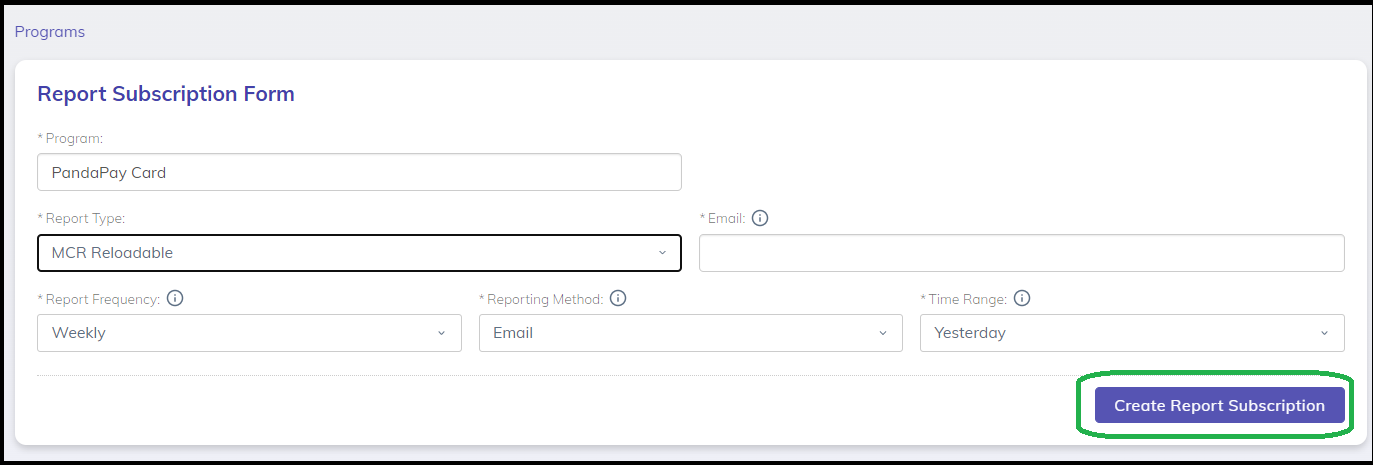
The Create Report Subscription page will allow you to customize your reports depending on your needs by choosing the following from the dropdown options:
- Report Type - report types enabled for the program (examples are above)
- Email - the email address where the report is sent to
- Report Frequency - reports can be received daily, weekly, or monthly
- Reporting Method - default is email but an SFTP server can be set up
- Time Range - is the timespan the report covers
-
Hit Create Report Subscription.
Card Issuing
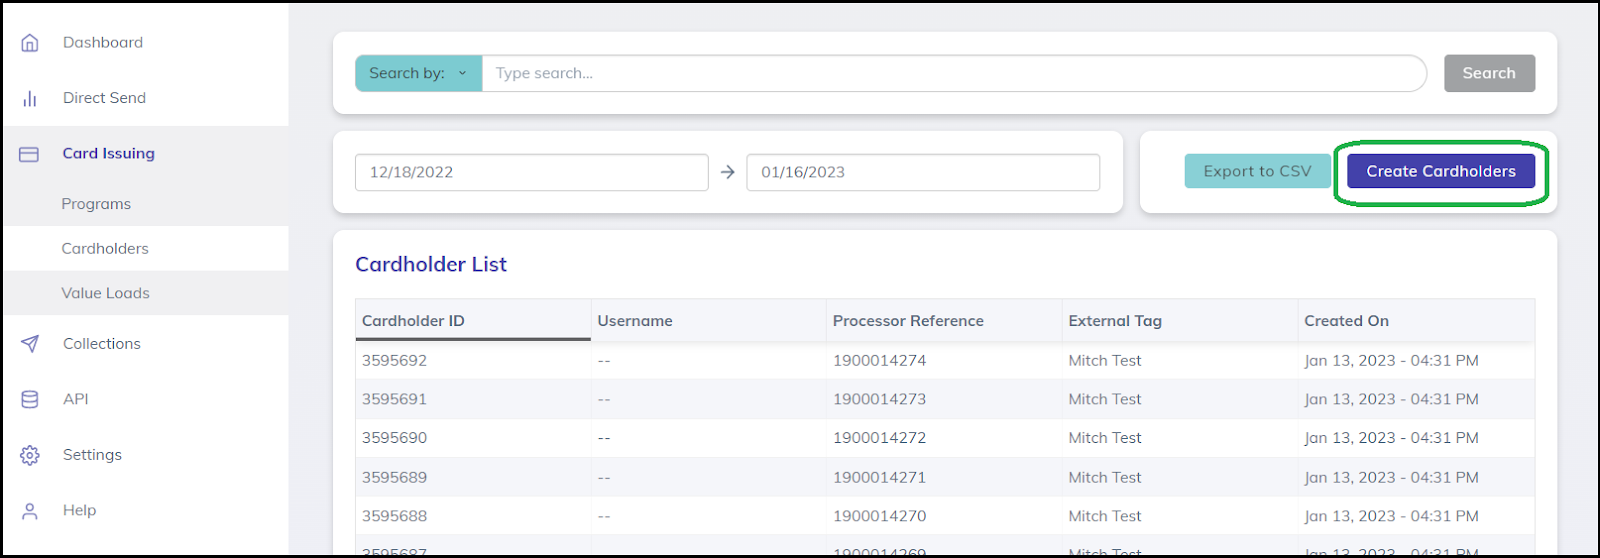
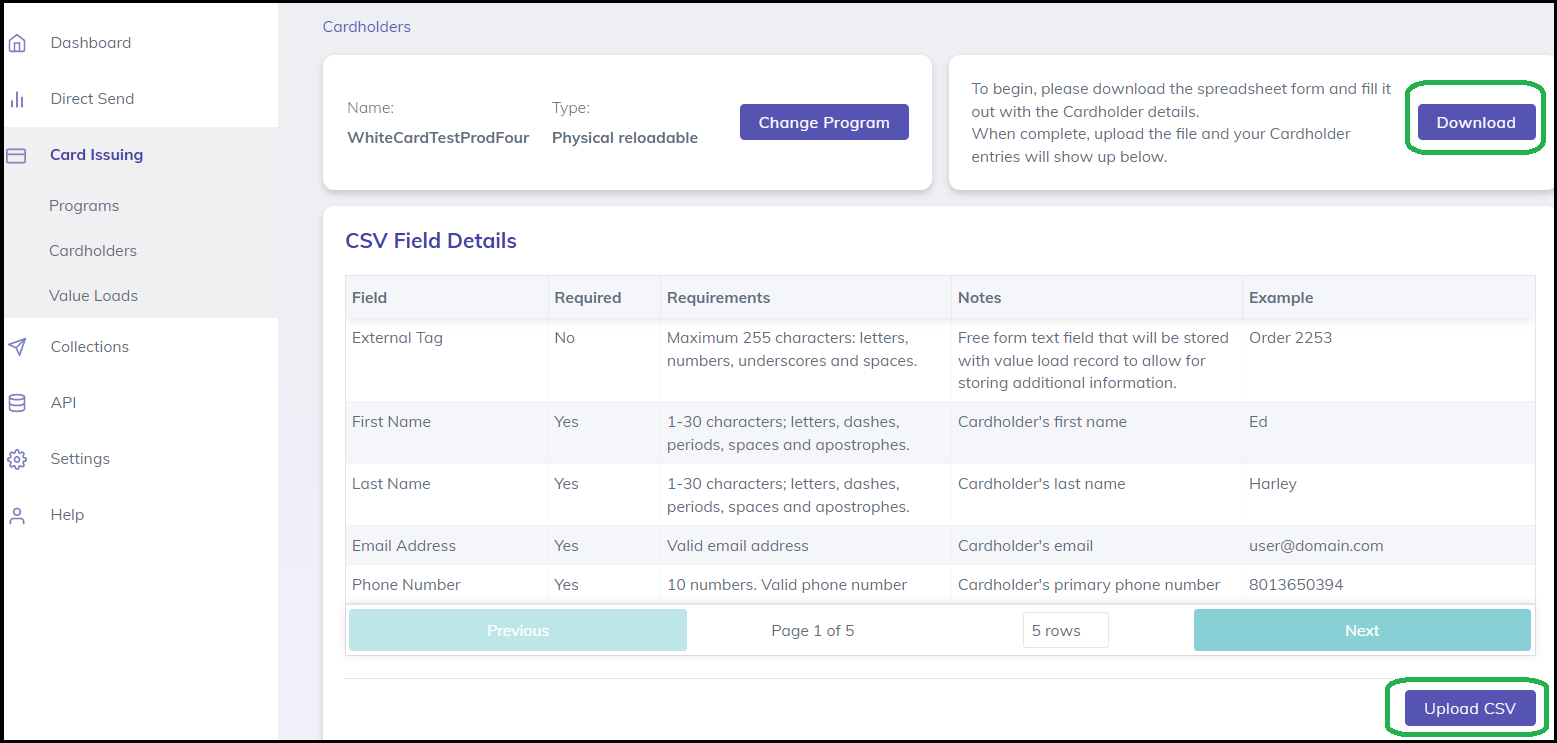
How do I order cards?
- Go to the Cardholders dashboard and hit Create Cardholders.
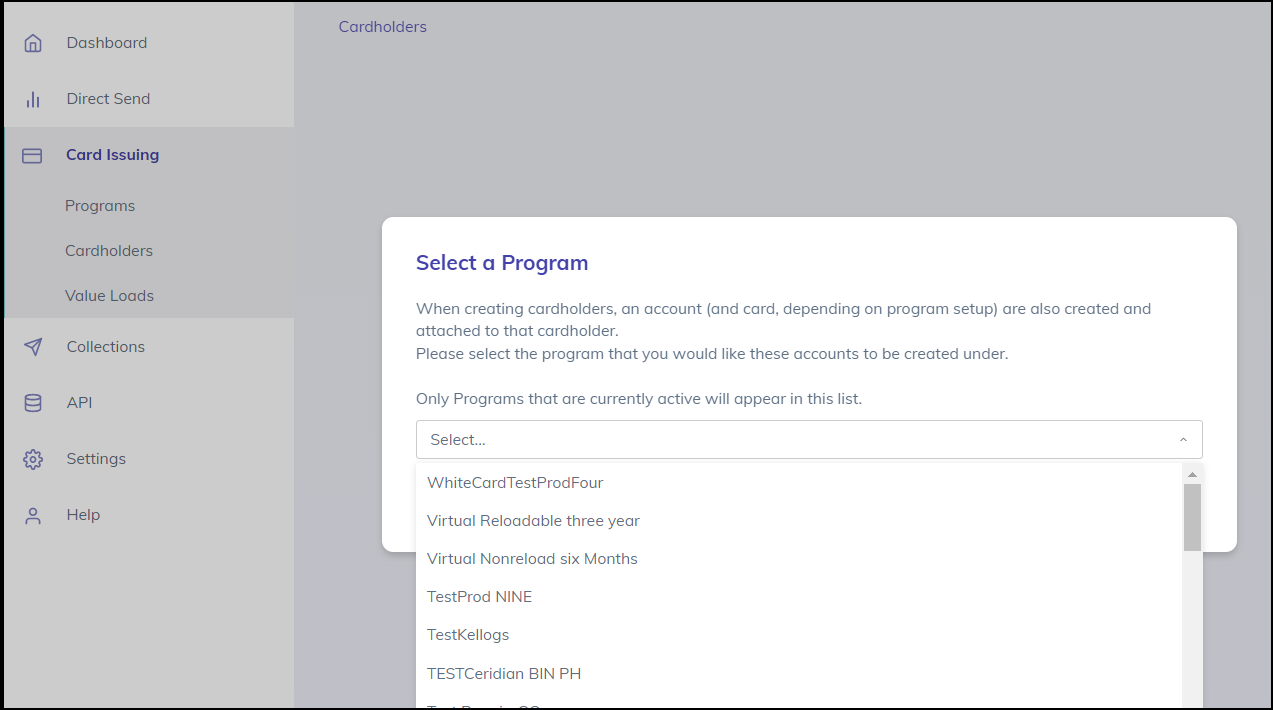
- Choose the program you want to use to create the cardholder from your program list.
- Download the CSV file and fill out the required fields (marked with *). Save and Upload the file. Click on Create Cardholder.
How do I fix the error message when uploading the files?

The order sheet goes through a validation process. If you see the error message as shown, the portal directs you to the specific cell/s that need correction. Below are some reminders when filling out the CSV file:
- Reminders in filling out the CSV file.
- External Tag - can be used as your own reference to identify a batch or a specific card. Permitted input: standard letters, numbers, underscores, and spaces
- First and Last Name - Permitted input: standard letters (avoid numbers) Spaces, dashes (-)
- Email Address - does not have to be a valid email address for physical cards but needs to be in the right email address format ex. [email protected]
- Phone Number - has to be a 10-digit number, this can be modified by the cardholder at a later time
- Date of Birth - follow dd-mm-yyyy format, needs to be a date that the cardholder would be at least 18 years years old
- Billing Address - state and country needs to be in the 2-letter format
- Shipping Method - these are assigned numerical code that are configured depending on your program
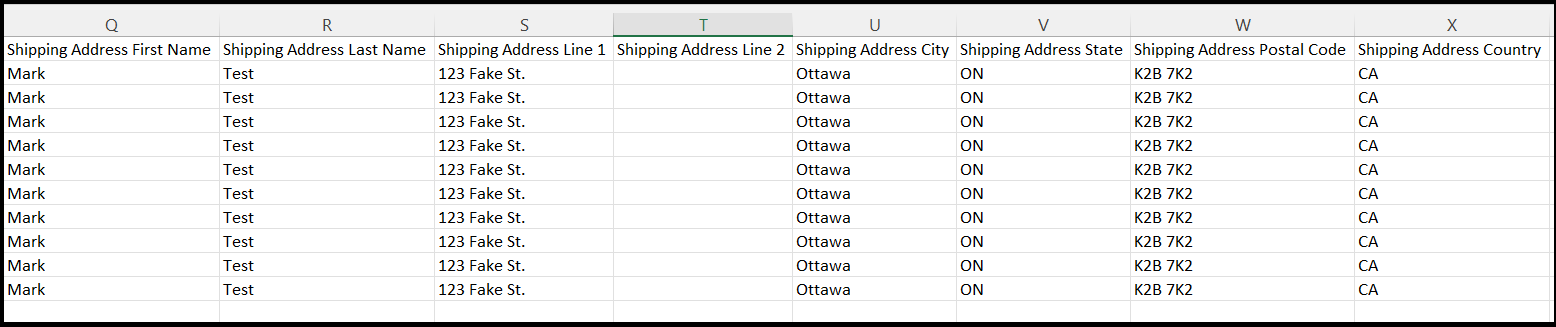
- Shipping Address - same format as the billing address, these fields can be left blank if the billing address and the shipping address are the same
How many cards can I create in one upload?
For peak efficiency, it is best practice to limit your card upload to up to 5000 cards at a time. Keep in mind that each row in the ordering sheet corresponds to a card.
What is the Emboss Line 2 field and how can I use it?
Emboss Line 2 allows you to print an extra message on the card, provided your cards do not have a chip (and the card details are printed on the front of the card). Permitted input: Standard Capital Letters, Numbers, spaces
Can I ship multiple cards in one bulk?
Yes you can. When using courier shipping methods, as long as the shipping address information (Shipping Address First and Last Name, Address Lines 1 and 2, City, State and Postal Code) are identical for each card you would like to bulk together, the package will auto-combine into one bulk shipment. Please keep in mind that the slightest difference in a cell can cause that one card to be shipped individually. It is advisable to just copy the first row and paste to all applicable rows.
*Not available for individual post shipping methods
Can I use a PO Box address for billing and shipping addresses?
PO Boxes can be used for cardholders in the billing address fields and for individual card shipping for any cards on a Canadian program. PO BOX cannot be used for UPS (courier with tracking) shipping addresses or for billing addresses on US programs.
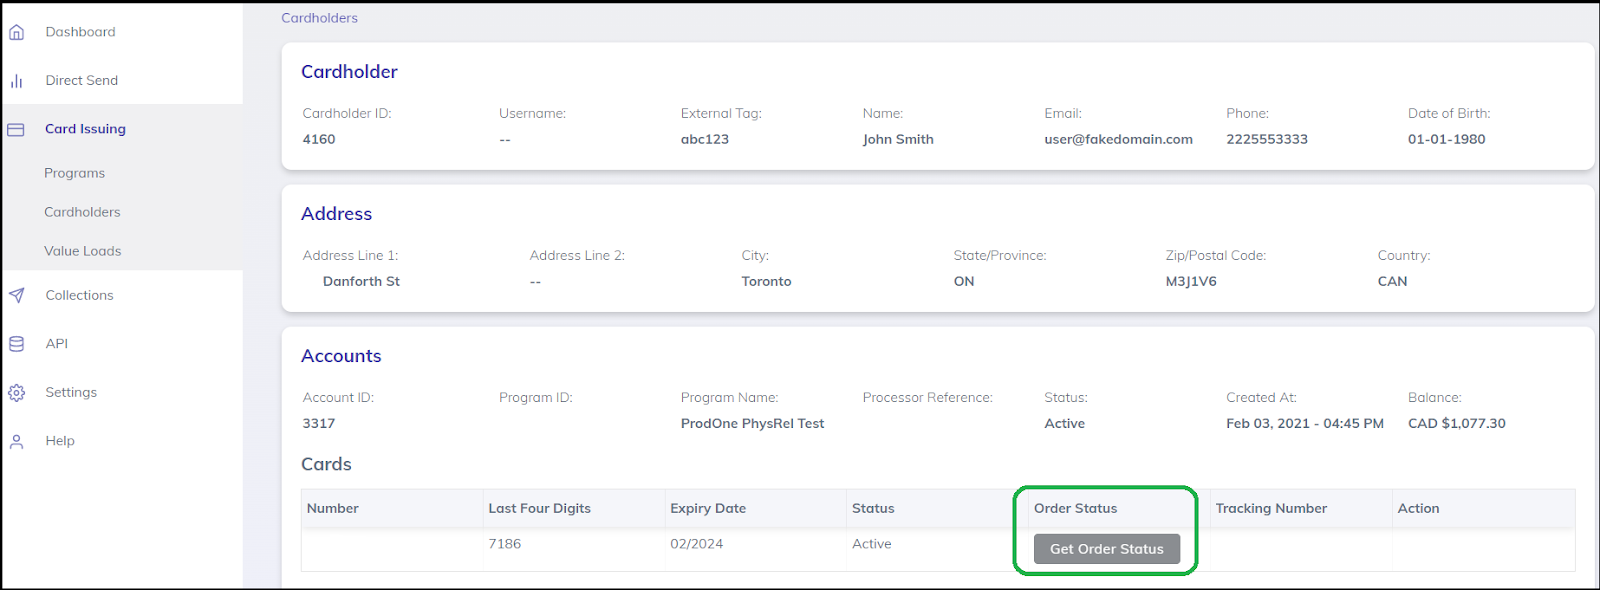
How can I track delivery of the cards I ordered?
Only cards shipped via UPS can be tracked. Once the cards are received by UPS, a tracking number is generated and can be found in the Cardholder’s Details Page by clicking on the Get Order Status button.
Where can I find the card number?
As part of compliance and regulatory requirements, the full PAN is only visible to the cardholder. You can use the Processor Reference Number (PRN) to identify the card. This is a unique number that is static to a card account. It can be found at the back of the card (for cardholders), in the portal by clicking on a specific card in the Cardholders section, and the MCR (for clients).
When do the cards expire?
Cards expire on the last day of the month of the printed expiry date on the card. Card validity time frames (6, 12, 24 or 36 months) will be outlined in your program agreement.
Can I keep the reloadable cards active beyond the printed expiry date?
Card expiration and renewals are agreed upon and outlined in the contract details. Unless otherwise stated in your program agreement, a new card will be reissued automatically before the expiration date, provided there is a value load made to the card within six months of the expiry month (keep in mind that expiry month starts on the 1st of the month and the loads need to be applied before that date for the card to be automatically re-issued).
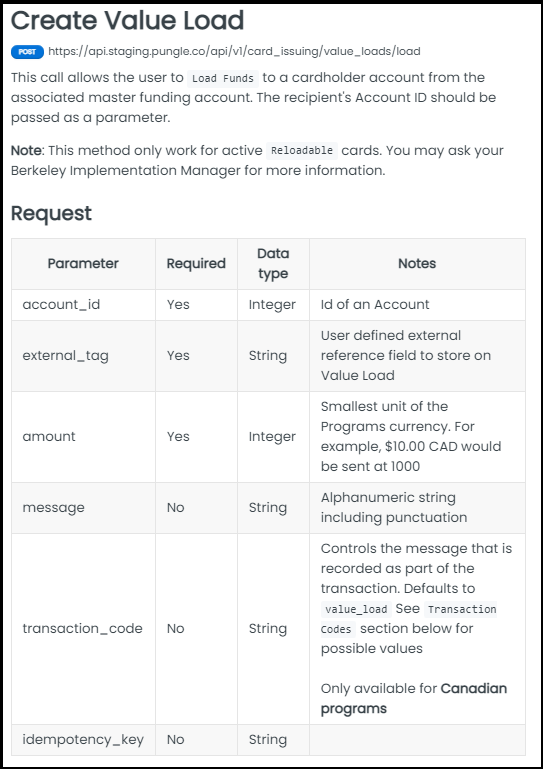
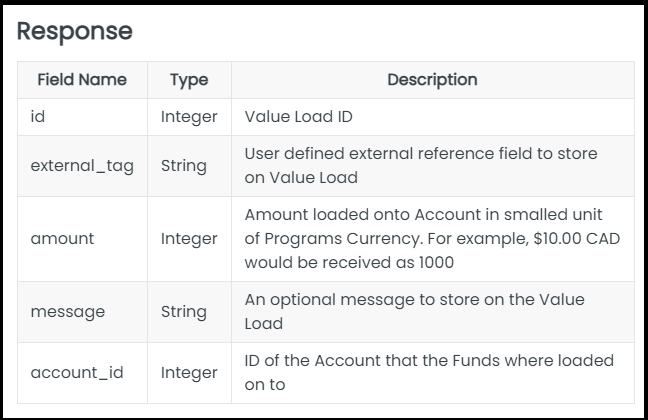
How do I load the cards through the portal?
- Go to the Value Loads tab, click on Create Value Loads button.
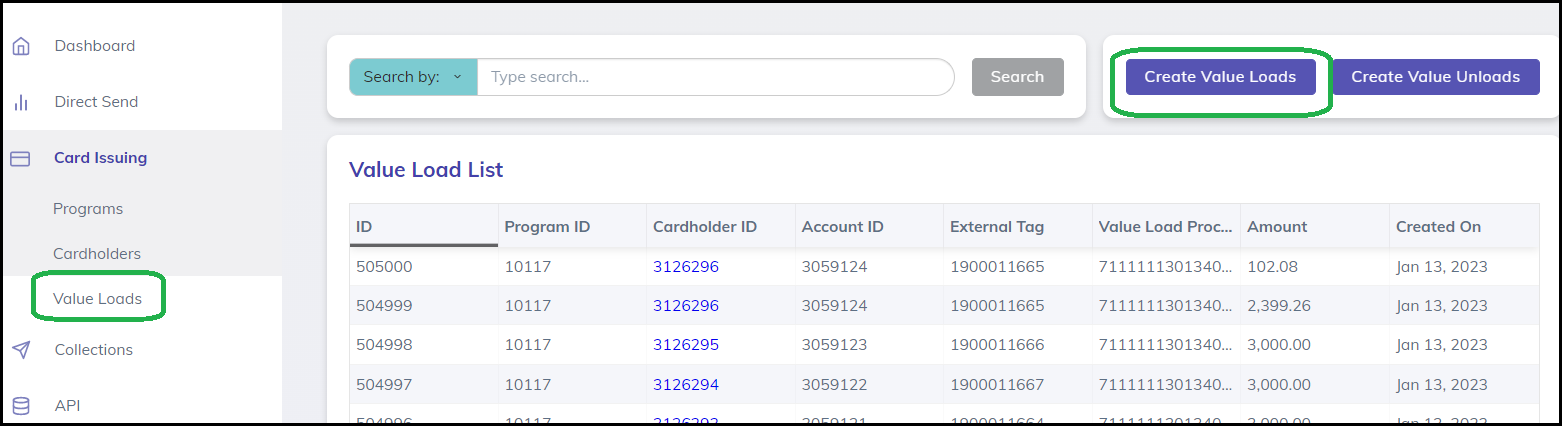
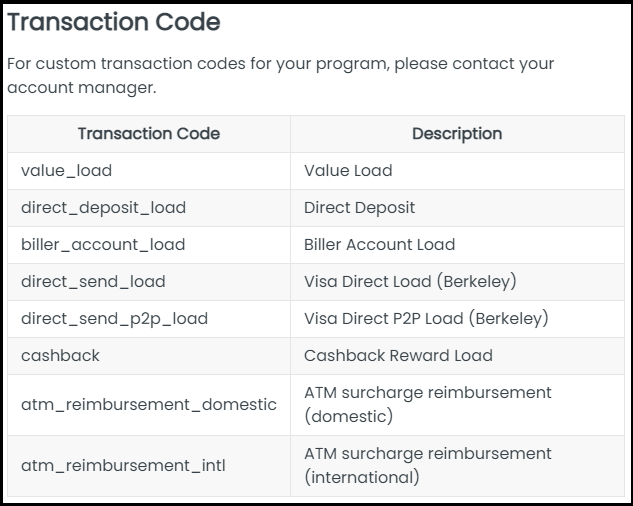
- Download the CSV file, fill in the required fields - Account ID (found in the portal or MCR) and the Amount. The External Tag and the Message fields are not required and can be used as your own identifier or a reference for the value load. Save the file, upload, and then click on Create Value Loads.
Can I order non-reloadable cards with 0 value and load them later?
Non-reloadable cards are loaded by adding a value in the Load Amount field in the CSV file when an order is placed. You can order non-reloadable cards with 0 value - and load them post delivery, but keep in mind that non-reloadable cards can only receive one load in total!
Why do I get an error when creating a value load?
The most common errors in creating a value load are insufficient funds and velocity rate limit errors. Insufficient funds means there aren’t enough funds available in your escrow account to support the load amount. Velocity rate limit errors mean limits such as the maximum or minimum load amount were not met or exceeded, or the frequency of the load in a given time range are reached. You can contact [email protected] to verify your program limits.
What happens if I order cards with values on them - but there weren't any funds in the escrow?
The card/s will be created and shipped without any funds. If for example 2 cards were created and loaded $10 each at the time of creation with only $15 on the escrow, then only the first card will be loaded while the other one will be shipped with no funds. Once you have funds in your escrow - you can load (once) any non-reloadable card retroactively.
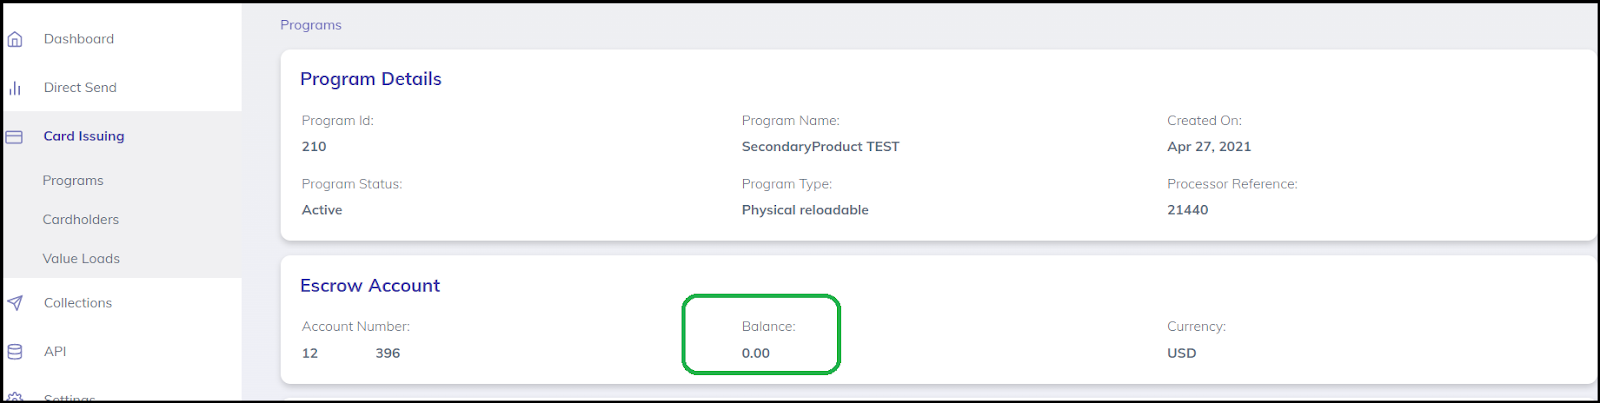
Where can I find my escrow account balance (program balance)?
The program balance can be found on the Escrow Account section of the portal. It can be found by clicking on your program from Card Issuing>>Programs.
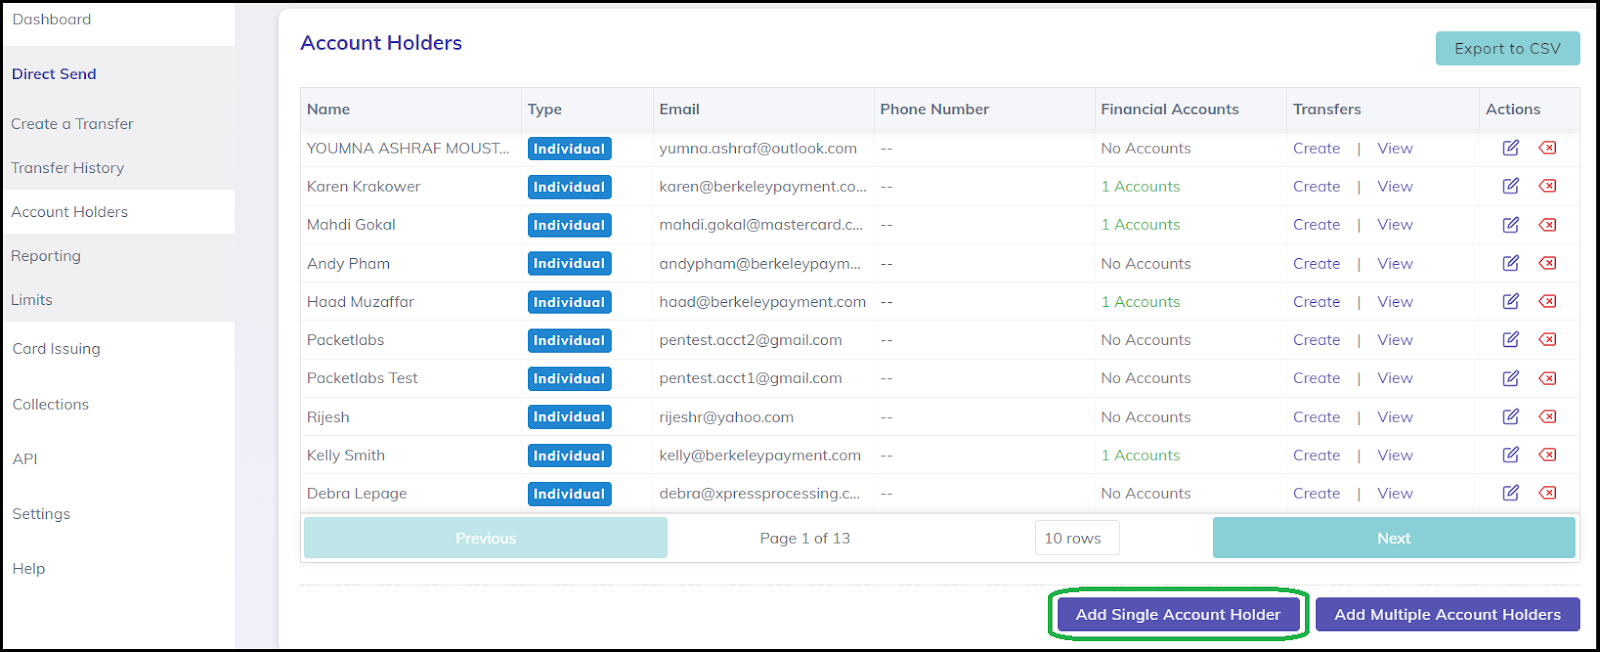
How do I create an Account Holder for Direct Send?
- Click on the Account Holders page from the portal dashboard. You can add new account holders one at a time by clicking on Add Single Account Holder.
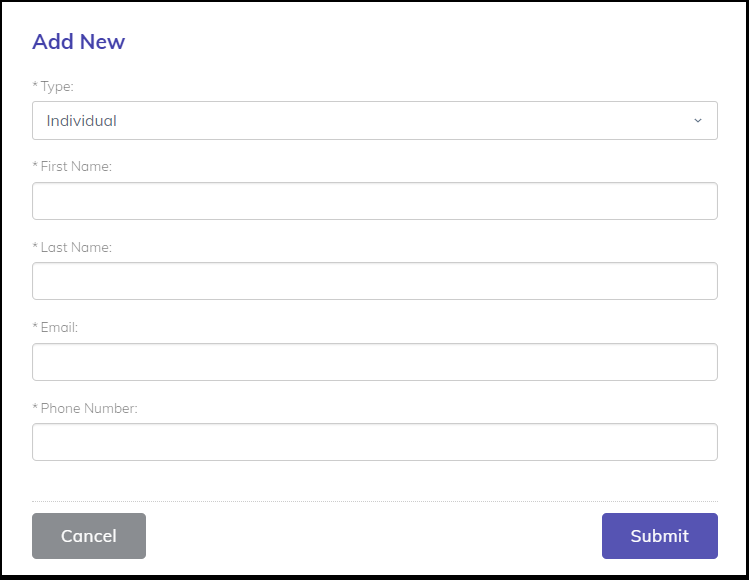
- On the pop up page, choose the account holder type (individual or business) then fill out the first and last name, email address, and phone number. After submitting, a message will pop up stating that the addition was successful.
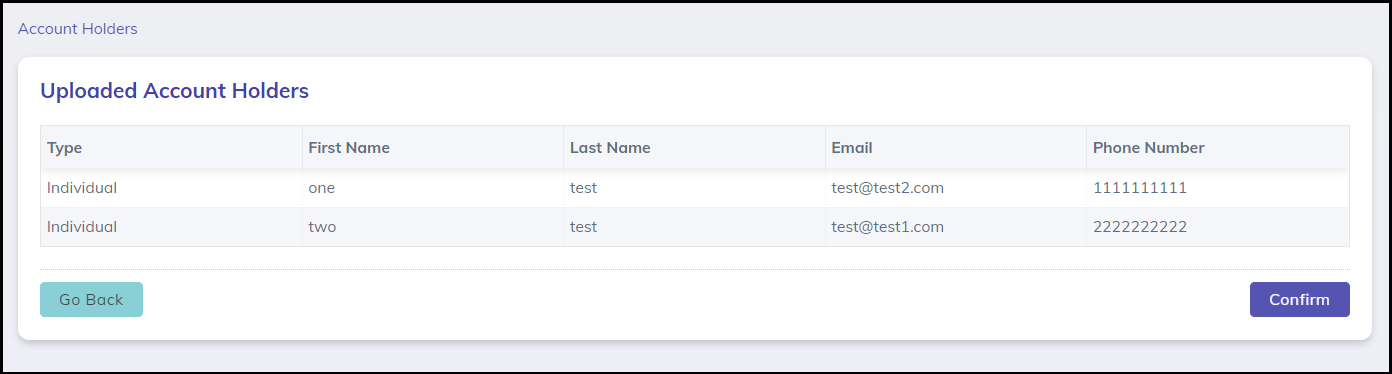
- Multiple Account Holders can also be created by clicking on Add Multiple Cardholders. This triggers a CSV file to be downloaded to your PC. Fill out the CSV with the required information then save. Click the Upload CSV button then choose your file.
- A new page will appear with the details on file for your review. Hit Confirm. A message will pop up stating the account holders were successfully created.
How can I link the bank information to the account holder?
- Look for the client in the Account Holder page, Click on the corresponding field opposite your account holder under the column labeled Financial Account.

- Look for the client in the Account Holder page, Click on the corresponding field opposite your account holder under the column labeled Financial Account after which the Add Payment button will appear.
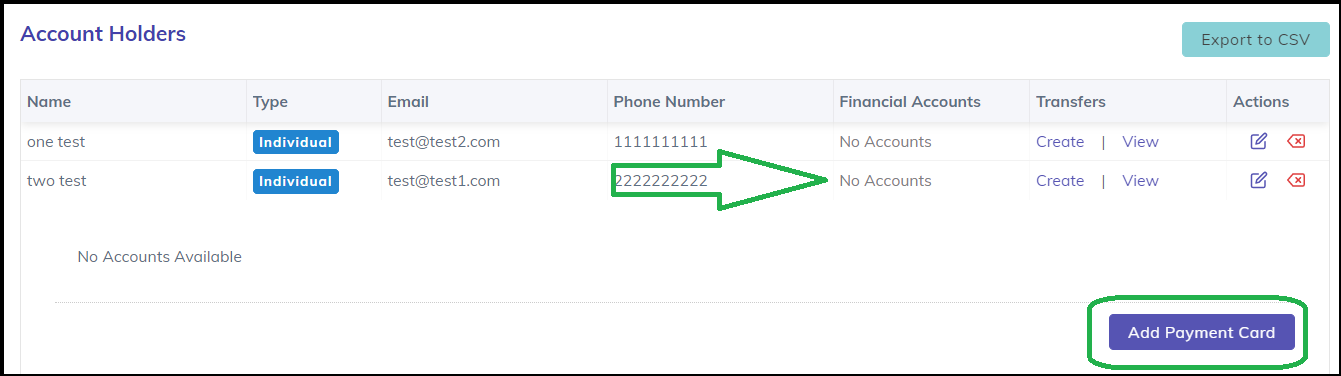
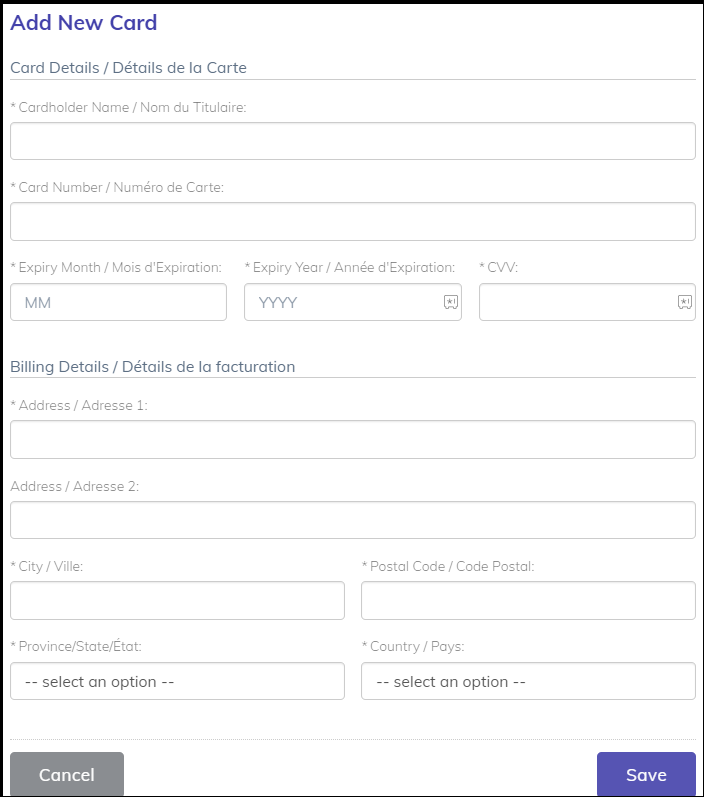
- Click on the Add Payment Card Button. The Add New Card page will appear wherein you will need to fill out the required card information. Hit Save.
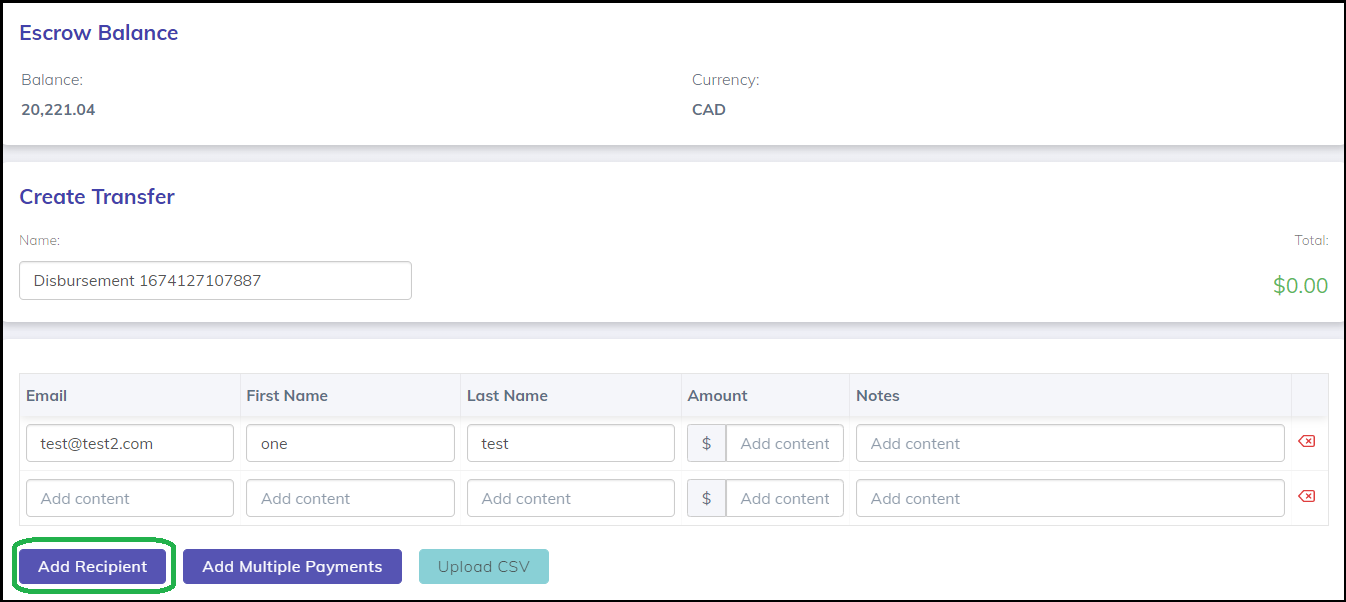
How do I process transfers?
- Transfers can be sent directly from the Account Holder page by clicking the Create link corresponding to the cardholder.

- You will be directed to the Create Transfer page where the email and account holder’s name is filled in. Add the transfer amount. (The notes field is not required and can be used as your internal reference for the transfer.) You can add more transfers by clicking the Add Recipient button and filling in the fields.
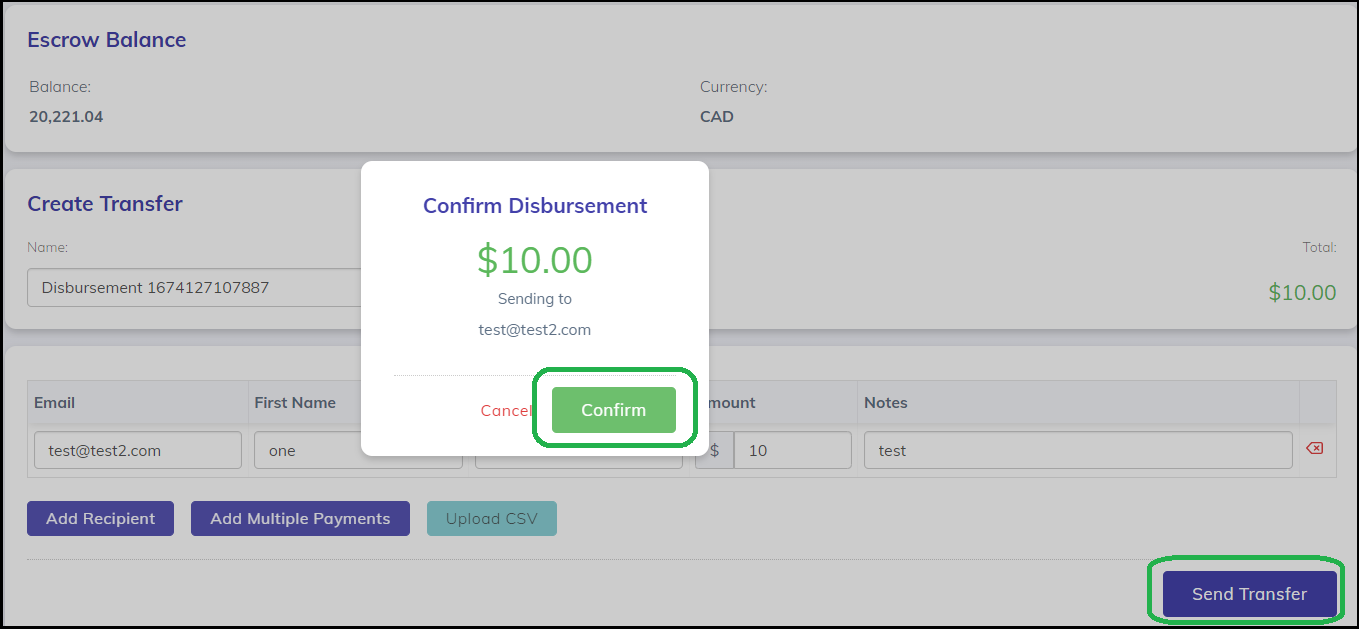
- Hit Send Transfer then Confirm.
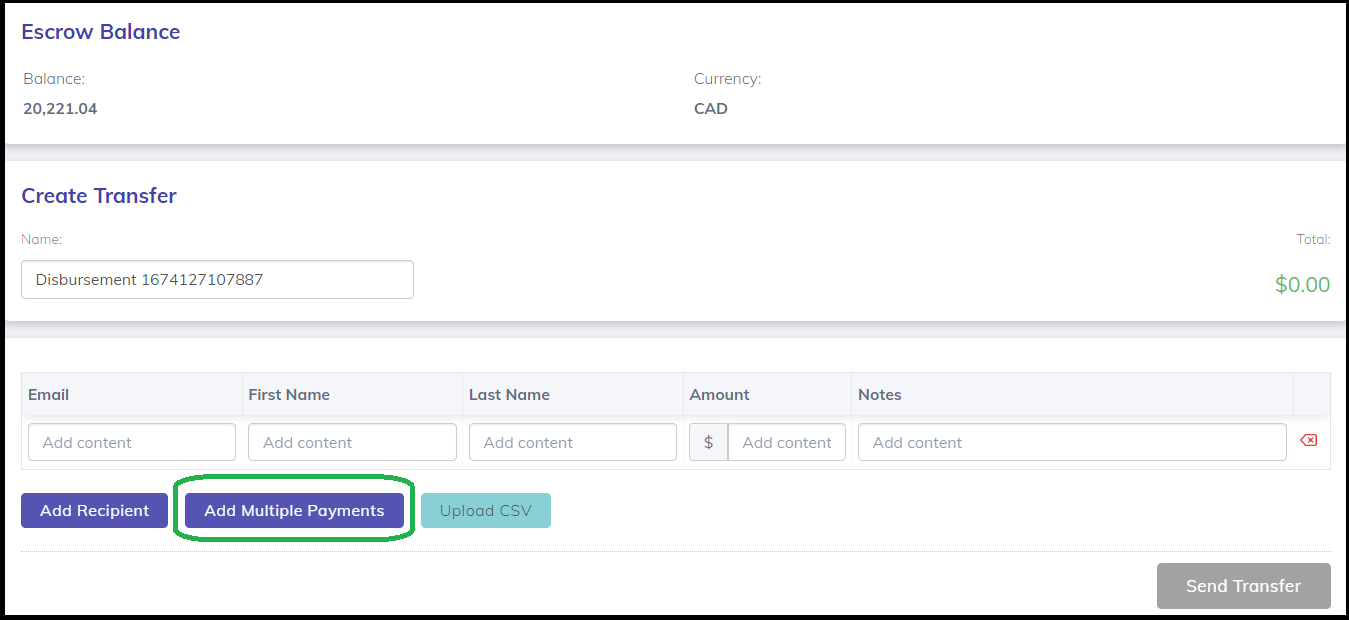
- Batch transfers can be accomplished by clicking on the Add Multiple Payments button which triggers a CSV file to be downloaded. Fill in the required details then save the file.
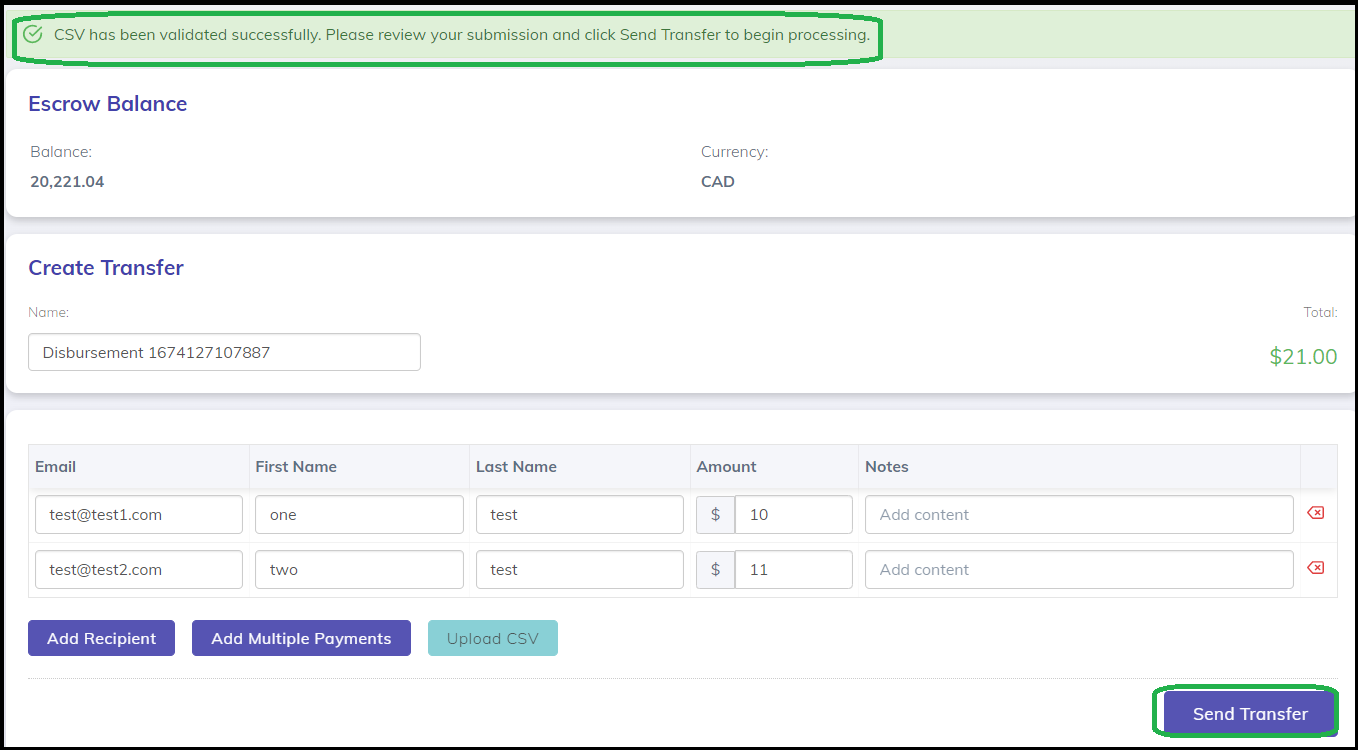
- Upload the CSV file. A message will appear at the top of the page confirming that the upload was a success along with a breakdown of the transfers you uploaded. Hit Send Transfer then Confirm.
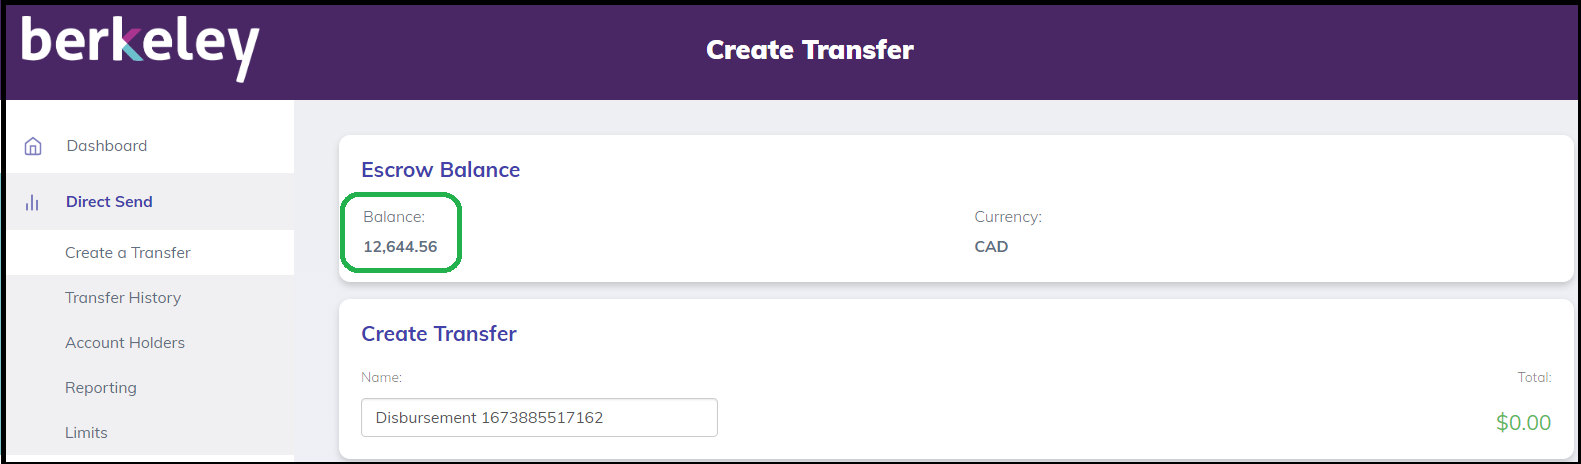
Where can I find my Direct Send balance?
The escrow balance is at the top of the Create Transfer page. Be sure to check the balance before transfers are made as the transfers might not go through due to insufficient funds. Note that Direct Send is subject to velocity rate and/or frequency limits as set by the bank. You can verify your limits by contacting the Client Support Team at [email protected].
What types of transfers can be done using Direct Send?
Direct Send can be used to debit (Pull) funds and credit (Push) funds to an account holder’s financial account.
How do account holders get notified about the transfer?
An email notification is sent to the account holder’s email address.
How long does it take before the funds reflect in the account holder’s account?
This is depending on recipient bank processing times and can vary across different programs.
My Pull transactions are not showing in my escrow balance immediately. Why?
Pulls take longer to reflect in the escrow. Unlike Push transfers, which are deducted immediately after the transfer is created, Pulls are settled by VISA on the next business day. Berkeley’s finance team then adds the funds to your account soon after.
Funding Your Master Funding Account (Escrow)
The payment instructions to fund your escrow account will be sent via email by the implementation team. Contact [email protected] for any other questions regarding your Berkeley escrow account.
API
What are the URL’s to integrate to Berkeley’s API’s ?
- Staging Environment: https://api.staging.pungle.co
- Production Environment: https://api.pungle.io
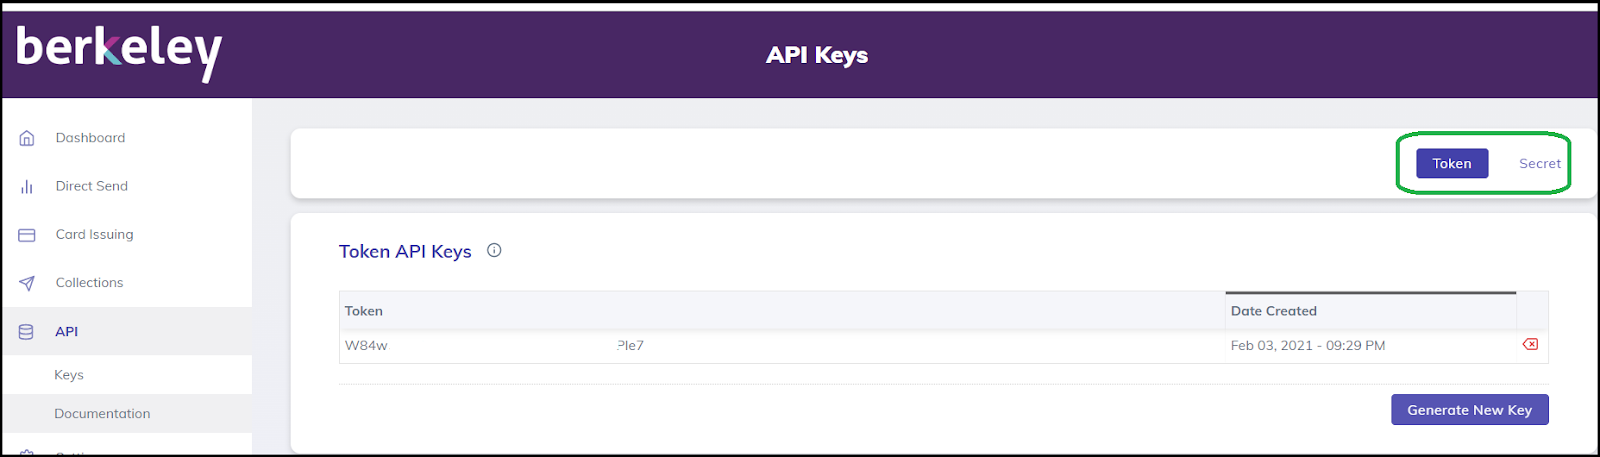
Where can I generate API tokens(keys)?
In the payhub portal, Click on API tab, then Keys. Choose what type of key you want to create - Token for a public key or Secret for a private key. Hit Generate. This page also stores previously generated keys.
Which key do I use to access Berkeley’s endpoints?
The secret or the private key allows access to all of Bekeley’s endpoints. The public key is only used on the client side applications to tokenize sensitive data from a payment card or bank account.
Can I share my private key?
The secret or the private key must be kept confidential. If you must share access to your program to a non-permanent personnel, you can create a key that expires after 15 minutes by generating a temporary key thru the Create Temporary Key endpoint.
Using the Berkeley API Documentation
- The right section of the page gives a menu of topics and the available API calls which are labeled either Post or Get.
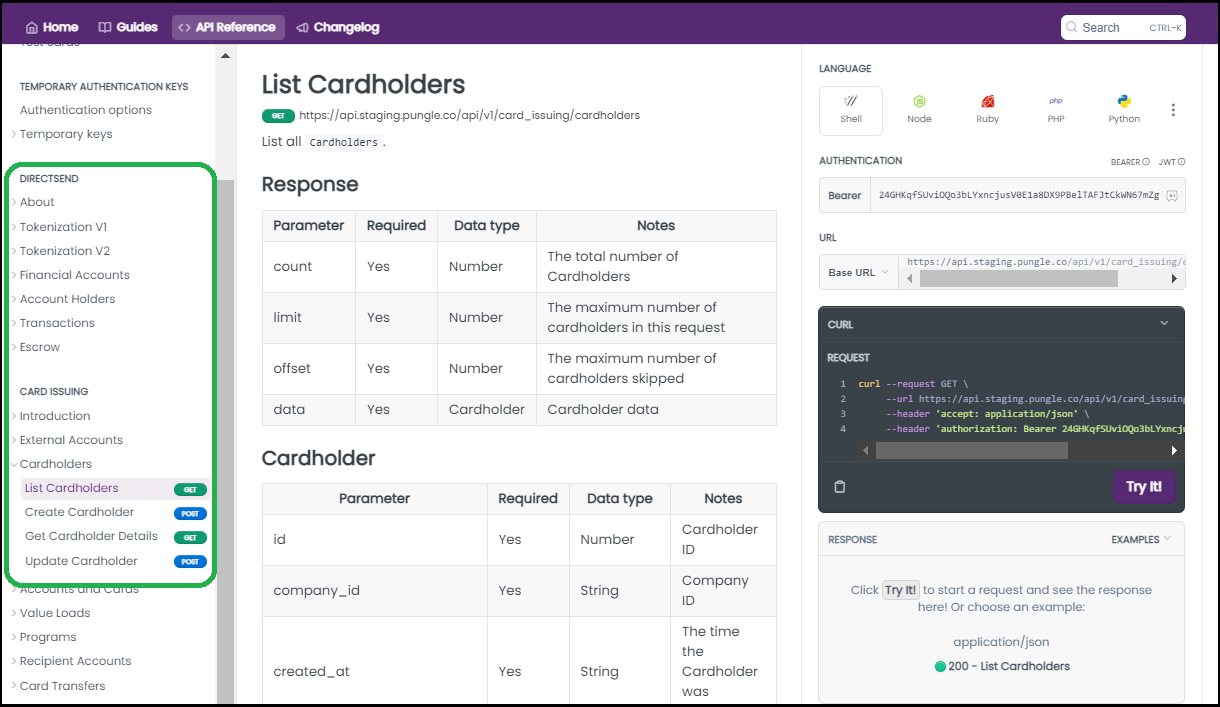
- The middle section starts with a description of the API call and what it does. It also gives an overview of the:
Request body - what fields are required in the request as well as useful notes on each of the parameters
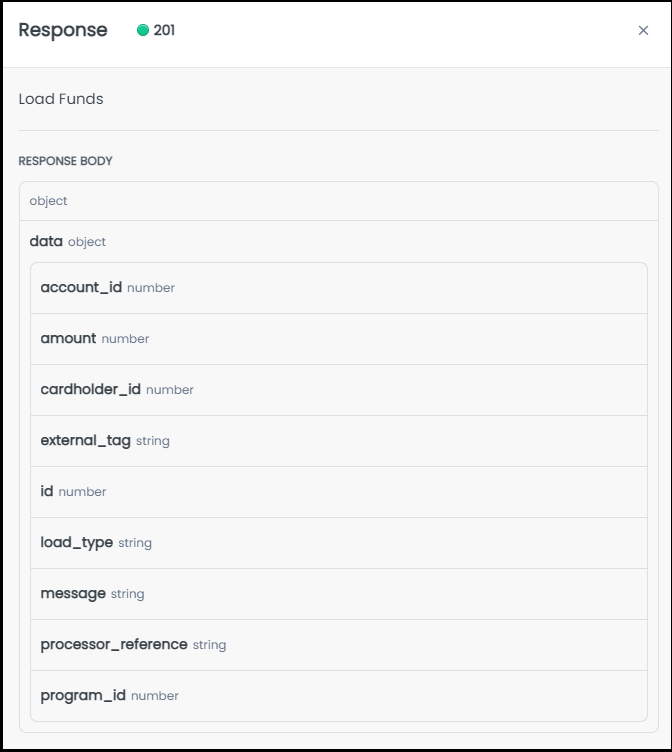
Response body - what fields are returned by the call and a description of the fields
Code values, field validation tables - guides what for what fields are valid, field equivalent values, etc.
Request history - overview of previous calls made and the responses
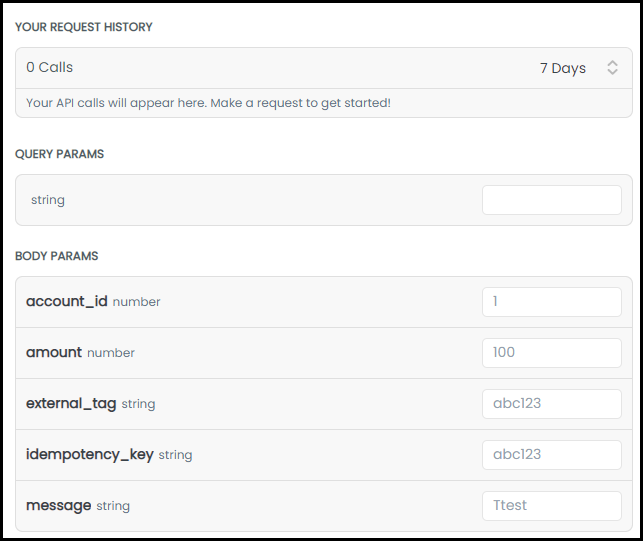
Sample call format - allows users to test the API call by filling in the required fields
Test Response - expected response based on the test call
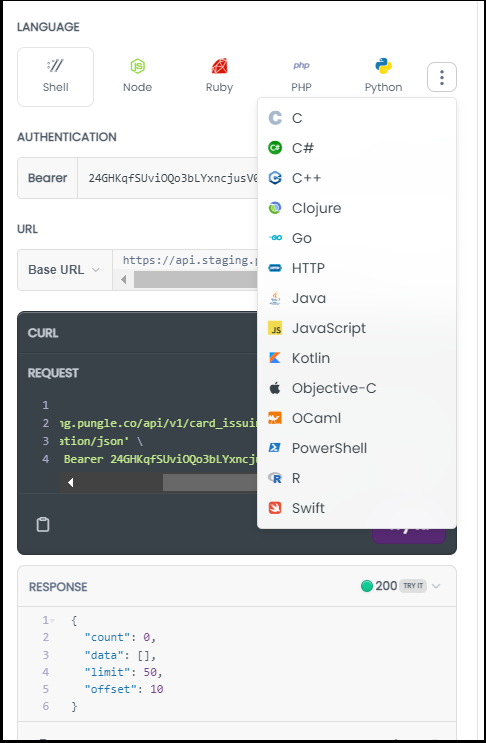
- The right section gives a feel of what the actual request and response feel like, also providing options to view the script in other languages
Response Codes
- 2xx (Successful) - may return or may not return an object in the response body
- 4xx (Client Error) - the request contains bad syntax or cannot be fulfilled due to incorrect parameters in the request
- 400 - Bad Request - request is invalid given the program configuration
- 401 - Unauthorised
- 404 - Not Found - requested resource was not found.
- 429 - Too Many Requests - too many requests have been received in a short time-frame
- 5xx (Server Error): the server failed to fulfill an apparently valid request
- 500 - Internal Error - internal error within the card-issuing platform.
- 502 - Bad Gateway - please contact Berkeley if you encounter this error
- 503 - Service Unavailable - the request cannot be processed at this time, usually resolves quickly and the request can be retried.
- 504 - Gateway Timeout - request has timed out, usually resolves quickly
Requests may still be successful even with this error so check the status of your request using the relevant GET/LIST endpoint.
Updated about 1 year ago